
TL;DR
Moving your rig into a closet can drastically cut noise, but ventilation and proper placement are key. Use targeted acoustic treatment, seal gaps, and plan for airflow to get a quiet, effective setup.
Ever wondered if a tiny closet can double as a vocal booth or a quiet workspace? It can — if you understand the difference between soundproofing and acoustic treatment. The biggest noise reduction comes not from foam but from physically moving the rig away from your ears. And the secret to a successful ‘rig in the closet’ is clever placement, strategic treatment, and smart ventilation.
This guide will walk you through the real-world techniques that turn a cramped closet into a surprisingly effective sound zone. Whether you’re recording vocals or just trying to keep your noisy PC out of sight, you’ll learn how to make it both quiet and safe.
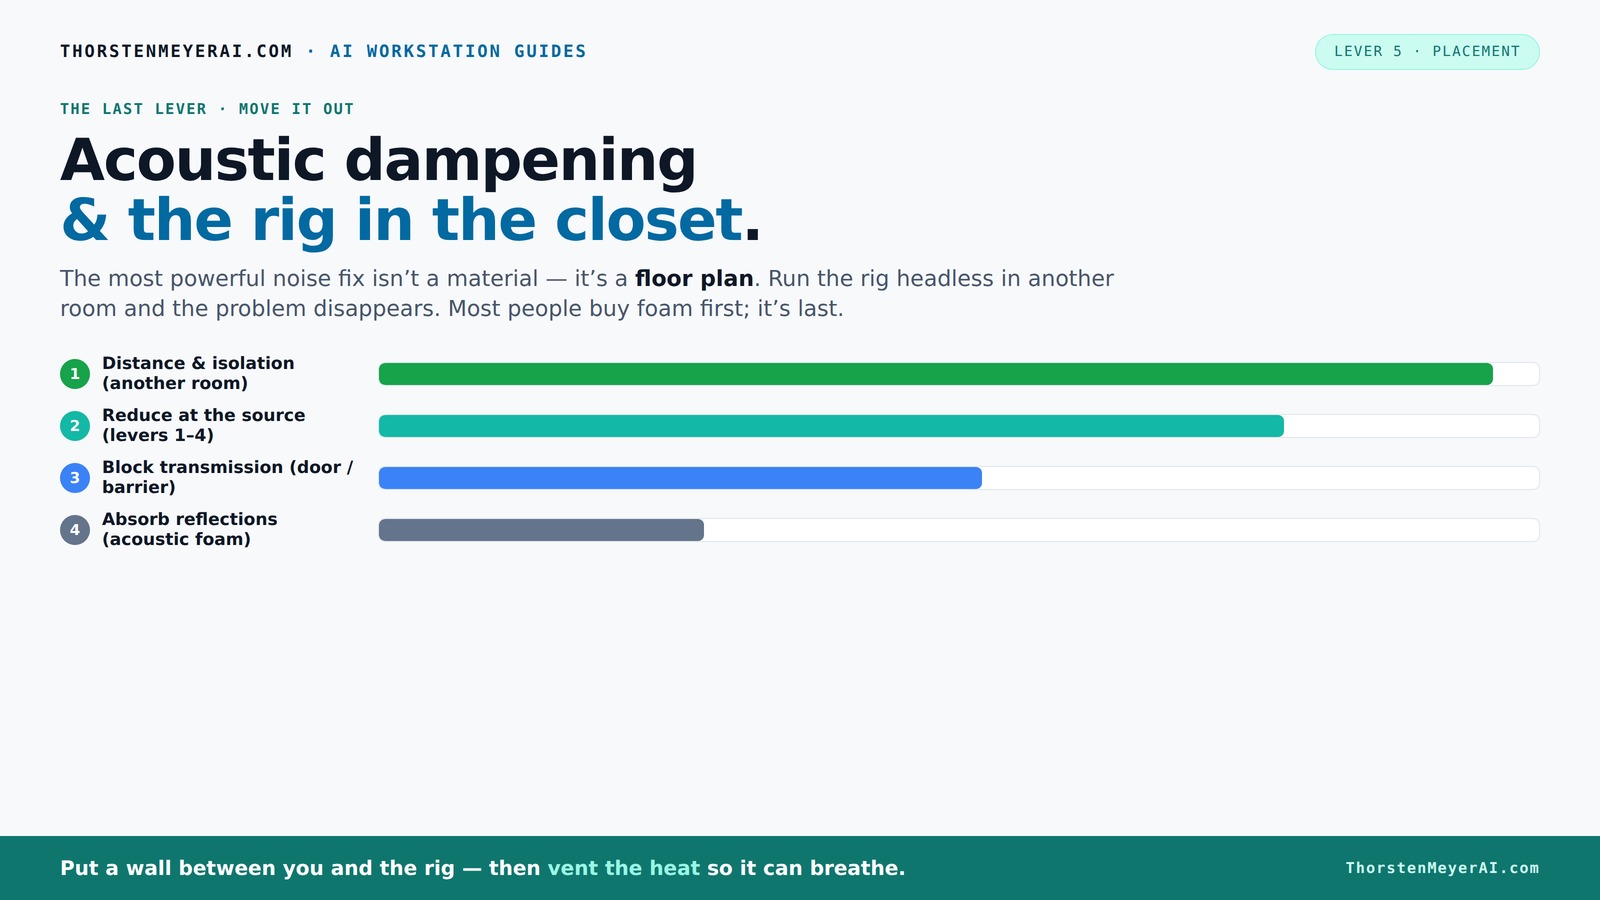
Acoustic dampening
& the rig in the closet.
The most powerful noise fix isn’t a material — it’s a floor plan. A rig you can’t hear because it’s in another room beats any amount of foam. Tap the approaches in Part 1 to see what actually works.
(another room)
(levers 1–4)
(door / barrier)
(acoustic foam)
Contain the noise, not the heat
Key Takeaways
- Moving your rig to another room or closet is the most effective noise reduction method.
- Proper ventilation and airflow are essential when placing a high-power machine in a sealed space.
- Treat reflection points, especially on side walls and behind the mic, to improve sound clarity.
- Bass traps in corners help control low-frequency buildup common in small spaces.
- Sealing gaps around doors and outlets dramatically cuts outside noise leaks.

Focusound 52 Pack Acoustic Foam Panels 1" x 12" x 12" Sound Proof Foam Panles Soundproofing Noise Cancelling Wedge Panels for Home Office Recoding Studio with 300PCS Double-Side Adhesive
Soundproofing - Acoustic foam panels triangular grooves structure for better noise absorption, helps to reduce and absorb unwanted...
As an affiliate, we earn on qualifying purchases.
As an affiliate, we earn on qualifying purchases.
Why Moving Your Rig Is the Biggest Noise Hack
The most effective way to cut noise is simple: put the rig somewhere else. A wall or another room? Even better. When your rig is tucked away in a closet or basement, the sound doesn’t reach you at all. You communicate with it over Wi-Fi or Ethernet, so it’s the perfect solution for a noisy GPU or server.
Imagine your desktop with a high-power AI rig. It roars away in a closet, while your workspace stays whisper-quiet. As long as you have a reliable connection, the noise becomes irrelevant. This approach saves you from pouring money into soundproofing materials that barely help if the source isn’t isolated.
In fact, moving the rig is so effective that it often makes other treatments unnecessary. No foam, no barriers — just distance.

Antec Flux SE Silent PC Case, Sound-Dampening Foam Side Panels for Quiet Operation, Walnut Wood Front Panel, 5 x PWM Fans, USB Type-C, 420mm Radiator Support, Back Connect Ready, E-ATX Mid Tower Case
Crafted with a combination of metal, glass and wood to create a high-quality texture with different materials. Sound-dampening...
As an affiliate, we earn on qualifying purchases.
As an affiliate, we earn on qualifying purchases.
The 'Rig in the Closet' Setup — Ventilation Is Non-Negotiable
Putting a hot, continuous-load machine in a sealed closet sounds ideal for noise reduction. But here’s the catch: heat builds up. A GPU running 600W+ of power in a closed space will cook itself unless you give it a way out. Overheating causes throttling, loud fans, and potential damage.
The fix? Active ventilation. A simple passive vent can help, but a quiet exhaust fan is better. It pulls hot air out and keeps the interior cool. Proper ventilation isn’t just about comfort; it’s about preventing thermal shutdowns, which can cause sudden noise spikes from fans spinning up unexpectedly, or even hardware failure. When designing your setup, consider the tradeoff between noise from fans and the risk of overheating. A well-ventilated space balances both needs, ensuring your equipment runs efficiently without noise compromises.
Learn more about managing heat and noise at your AI workstation.

TroyStudio Bass Traps - 24 Pcs 4 X 4 X 12 Inches Dense Thick Studio Bass Foam Corner, Acoustic Treatment Panel Absorbing Echo Reverb, Low Frequency Sound Absorber for Music Room Home Recording Studio
【SPECIFICATION】: Dimensions - 4 X 4 X 12 inches, pack of 24; Light Weight - 0.07 lbs per...
As an affiliate, we earn on qualifying purchases.
As an affiliate, we earn on qualifying purchases.
Acoustic Dampening 101: Inside the Closet
Acoustic dampening isn't just about blocking sound — it’s about controlling how sound behaves inside the space. In a closet, sound waves bounce off hard surfaces, creating echoes and harsh reflections that can make recordings sound unnatural or dull. Foam panels, blankets, and rugs absorb high frequencies and diffuse sound waves, preventing them from bouncing repeatedly and causing coloration or muddiness in recordings. The deeper purpose is to create a controlled acoustic environment where your voice or instrument can be captured clearly, without the room's influence muddying the sound.
For low frequencies, like the deep hum from your GPU or bass notes, bass traps are essential. They absorb these long-wavelength sounds, preventing them from accumulating in corners where they can cause a muddy or boomy sound. Think of bass traps as giving low-end energy a designated space to dissipate, which results in cleaner, more accurate recordings. The tradeoff is that adding too many treatments can deaden the space excessively, so balance is key. Proper placement of absorption panels at reflection points, combined with bass traps in corners, creates a balanced acoustic environment that improves clarity without sacrificing natural liveliness.
Remember: controlling sound reflections improves both recording quality and monitoring accuracy, allowing you to hear your true sound without room coloration.

TroyStudio Portable Vocal Booth, Large Foldable Microphone Isolation Shield, Music Recording Studio Sound Echo Absorbing Box, Desk & Stand Use Reflection Filter with Thickened Dense Acoustic Foam
【BASIC INFO】: Inside size after setup: 8'' (L) X 10'' (W) X 12'' (H), large space for various...
As an affiliate, we earn on qualifying purchases.
As an affiliate, we earn on qualifying purchases.
Where to Place Acoustic Treatment for Best Results
Placement matters more than the amount of foam. Proper positioning of acoustic panels directly influences how effectively they absorb reflections and improve sound clarity. Starting with the reflection points on side walls is crucial because these are the spots where sound rays bounce directly toward your ears or microphone. The mirror trick helps identify these points: sit at your listening or recording position, hold a mirror along the wall, and observe where the speakers or monitors are reflected. Mark those spots for panel placement. Properly placed panels reduce early reflections that can color your sound, leading to a more accurate and natural tone.
Next, treat the wall behind your mic or speakers. This minimizes sound bouncing behind your setup, which can cause phase issues or coloration. Adding a panel or two on the ceiling above your mic helps catch overhead reflections that might otherwise cause a sense of 'boxiness.' Finally, corners are low-frequency hotspots. Bass traps placed in corners absorb energy from low-end frequencies, preventing a boomy or muffled sound. If your room sounds overly dull or muddy, adding bass traps in these areas will help balance the low frequencies. Seal gaps around doors and outlets with weatherstripping or acoustic sealant to prevent outside noise leaks, which can undermine your carefully placed treatments. Proper placement ensures your acoustic treatments work efficiently, providing clarity without overdoing it.
Do You Really Need Bass Traps in a Closet?
Bass buildup in small spaces is a common issue that can significantly distort the quality of your recordings. When low frequencies gather unchecked, they cause a muddy, boomy sound that obscures detail and reduces clarity. Bass traps are designed to absorb these low-end waves, preventing them from bouncing around and creating problematic resonances. In tiny closets, corners act as low-frequency collectors because sound waves naturally converge there, making these spots ideal for bass traps. Properly installed, they help achieve a more balanced frequency response, resulting in clearer, more natural recordings. However, over-treating can deaden the space, making it sound unnaturally dry and lifeless. The key is to assess your room’s frequency response—if it sounds boomy or muffled, targeted bass trapping is worth the investment. Use bass traps sparingly, focusing on corners or areas where low-end buildup is evident, to preserve a lively yet controlled sound. This balanced approach ensures your recordings retain their natural character without excessive resonance or deadness.
Sealing the Door and Leaks — The Easy Wins
Gaps around doors and outlets are sneaky sound leaks that undermine your entire effort. A hollow door with gaps acts like a speaker grille, allowing sound to escape and outside noise to seep in. The simplest fix is weatherstripping or acoustic door seals, which create an airtight barrier. Covering the door with a moving blanket or heavy curtain adds mass and absorption, further reducing noise transmission. For outlets and electrical gaps, use acoustic sealant or outlet gaskets designed to block sound passage. These small, inexpensive steps significantly improve isolation by sealing common leak points. Remember, no matter how well you treat the inside of your closet, leaks in the door or walls will allow external noise to infiltrate, defeating your efforts. Prioritizing sealing these gaps ensures your acoustic treatments and placement work as intended, providing a quieter, more professional environment.
DIY Solutions vs. Professional Soundproofing: What Works?
DIY solutions like blankets, rugs, and reflection filters are excellent for quick, affordable improvements. They help reduce echoes, control reflections, and improve the immediate sound environment, especially in rental spaces where permanent modifications aren’t possible. However, these solutions mainly address mid and high frequencies and have limited impact on external noise or low-frequency hums. Professional soundproofing involves dense, mass-loaded materials such as drywall, mass-loaded vinyl, and specialized panels that add mass and damping to walls and doors. These methods significantly reduce external noise transmission and low-frequency leakage but come with higher costs and permanence. For most home studios or small setups, a hybrid approach is effective: use DIY treatments to improve sound quality and seal gaps to block external noise; consider professional solutions only if external noise remains a persistent problem. Balancing cost, convenience, and effectiveness is key to creating a quiet, functional space without overinvesting in unnecessary treatments.
Microphone & Performer Placement—Getting It Right
In tight spaces, mic placement is critical because it directly influences the quality of your recordings. Position your mic slightly off-axis from reflective surfaces to avoid capturing unwanted room reflections, which can cause comb filtering and coloration. Use the first reflection point — the spot where sound hits first — for panel placement. To identify this point, sit at your recording position and have someone move a mirror along the wall until you see your speakers reflected; place absorption panels there. Position the performer or speaker so they face away from reflective surfaces and toward treated areas, minimizing the room's influence on the sound. Experiment with mic distance: closer mics capture more direct sound and reduce room noise but may introduce plosives or proximity effects. Use a reflection filter or portable acoustic shield if space is limited, but remember these are supplements, not substitutes, for proper placement and room treatment. Prioritizing correct placement ensures your recordings are clear, natural, and free of unwanted room coloration.
Frequently Asked Questions
Can a closet really be turned into a vocal booth?
Yes, with proper treatment and sealing, a closet can function as a decent vocal booth. Focus on controlling reflections, sealing gaps, and adding absorption at key reflection points. It won’t be perfect, but it’s often enough for home recording and voice work.
What is the difference between soundproofing and acoustic treatment?
Soundproofing blocks external noise from entering or leaving a space — like sealing gaps or adding mass. Acoustic treatment improves how sound behaves inside the room by reducing echoes and reflections — like panels, foam, and bass traps.
Where should I place acoustic panels in my closet studio?
Start with the first reflection points on the side walls and behind your mic. Use a mirror trick: position panels where you see your speakers in the mirror. Then, treat the ceiling and corners for low frequencies. Seal gaps around the door.
Do I need bass traps in a closet?
If your recordings sound boomy or muddy, bass traps in corners can help. They absorb low frequencies that tend to gather in small, enclosed spaces. Use them sparingly to keep the sound natural and lively.
How do I prevent my space from sounding dead?
Balance absorption with some reflective surfaces. Don’t over-treat — keep some natural room liveliness. Use diffusers or lighter materials in areas where you want a bit of sound bounce, avoiding an overly dead sound.
Conclusion
Turning a closet into a quiet, effective workspace or vocal booth is entirely doable with strategic placement, smart treatment, and ventilation. Remember: the goal isn’t perfection — it’s reducing noise, controlling reflections, and keeping your gear safe.
Imagine a tiny closet, humming with heat but silent from your perspective. That’s the power of good setup. Your best move? Focus on sealing gaps, treating reflection points, and ventilating well. Your quiet workspace is just an effort away.